How to Make a Gondola
…and why.
I signed up for the Prom Committee for a change of pace. The theme was ‘A Night In Italy’. Although no Martha Stewart, I do love creating things. I was hoping to make the center pieces for the tables but that job was already spoken for. I would have felt more comfortable doing that.
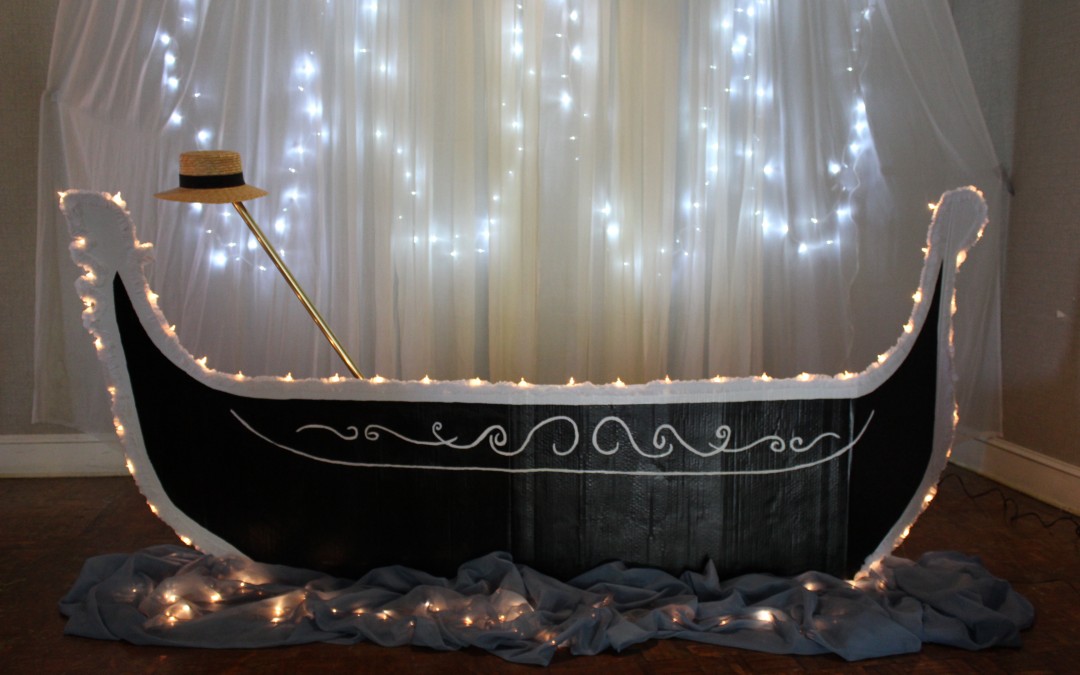
When I was asked to make a gondola, I must admit, I was a little intimidated. Especially when I realized it was meant to be a part of the photo op. Yikes! This meant my gondola may last forever… in photo albums of attendees, never to be forgotten. No pressure, right? I would be lying if I said I didn’t lose any sleep over this thing. And yes, I worried about it too much. It is the fear in me that I will let people down, I am sure. And with a prom budget of only $100, we had to be creative.
I decided to write about it for 2 reasons:
- Making the Gondola was seriously out of my comfort zone. In my efforts to purpose myself to try new experiences this year, I said yes.
- I tried to find a YouTube video or blog post on how to make a gondola and couldn’t find anything except small origami or expensive cutouts online. If I can just encourage one person…
3 ways making a gondola stretched me:
- Saying yes forced me to step out of my comfort zone. I had to figure this out.
- Asking for help, ideas, and/or suggestions made my end product better than keeping it to myself. When looking for an inexpensive border to hide the edges, my mother-in-law suggested using streamers. So she gathered the streamer with thread on her sewing machine and I hot glued it to border the boat, hiding the cardboard’s rough edges. I was so pleased as the cost was a 99 cent streamer and my MIL’s loving time.
- Offering help where you can to others is a win-win. Committee members did not work selfishly on their own projects, but together. I was able to get carpet tubes from my local Floor covering store, Brown’s Floor Covering, and 1st love at no cost for the lamp posts another gal made (see below). Several offered paint for my gondola. And with paint I also had on hand, it cost nothing. These were offered freely, thoughtfully. I have about $7 in this boat. The one below I found online was over $280 with shipping.
- Done is better than perfect.

The ivy paper covered cardboard boxes that were used to make an arch. Didn’t Amanda do a beautiful job!?! The carpet tubes were used to make lamp posts. Spray painted lanterns sit atop.

Lisa’s table centerpieces for A Night in Italy
Photo by Denise Herndon
How to build a gondola for under $10:
1- Try hardware and appliance stores first to find a large piece of cardboard. Call before going to see if they can hold it for you. Many places recycle immediately. Consider checking on Craig’s List. I must admit, when Amanda found this large piece of unbent cardboard in one piece, I believed she had an angel helping her.

2– Use a picture as a guide. I used the photo above from Stump Party as a guide and freehanded it with chalk.
3- Tape it off before painting it. I used spray paint as a base, then a coat of flat, and then a coat of gloss. For the white border, I just used gloss paint. Painters tape works well.
4- Don’t be afraid to teach others how to make a gondola. Normally I would have been too uptight to chance a mistake, but my 9yo did a great job.

My free paint. (above). Gloss worked best as a final coat.
5- Trim the painted design with a chalk pen. This helped me to erase easily and get the lines like I wanted it. Notice it isn’t perfect. I darkened lines with white gloss paint to finish it off.

6- If you look closely, you can see 2 small cardboard flaps I left on the left and right side of the boat at the suggestion of my oldest (In case I needed to help it stay upright, which I did). It was a great idea I wouldn’t have thought of. In addition, when these tabs were pulled with string from the inside, it caused the boat to appear curved/3-D.

7- Hot glue on an inexpensive paper border to hide rough edges. My MIL made a gathered streamer with thread and a 99 cent streamer on her sewing machine.
8- The biggest problem I had was getting it to stand up on it’s own. I glued foam board on either inside end to keep boat from bending horizontally and then attached with hot glue a card board piece on either inside end, perpendicular; like a picture frame has on the back of it. As a back up I included a bucket that I stringed to the boat flaps I left on either end. The bucket ended up being a good place to set the oar between photos. (It also held duct tape, string, and a hot glue gun in the event of an emergency 🙂 )
9- White Christmas lights make anything look good! I first tried using duct tape to attach the lights but humidity after a rain released almost every piece. I hot glued the lights and they were permanently on there. Most of my money was in the glue sticks. The lights cost $1 from a yard sale.

There is a stool behind the gondola for photos. We also had gondola hats (one purchased from Amazon, and several from thrift stores; with added ribbons) and a gondola stick (Remo e’ Forcola) for the guys/gals to use (which was just a curtain rod).
10- Pray! Well, the Gondola has landed. And when I dropped it off at the prom venue, it was standing. Praise God.

The sheers (white backdrop and blue water) came from Good Will/Thrift stores (constructed by Neecie.)

Photo By Denise Herndon

Photo By Denise Herndon
You CAN do this!
Behold, I am doing a new thing; now it springs forth, do you not perceive it? I will make a way in the wilderness and rivers in the desert.–Isaiah 43:19 ESV


Thank you so much for sharing this post…it is a tremendous blessing and saved me from having to come up with my own design. Thank you thank you thank you!!!
Thank you so much for sharing! It was MY idea to have a Venetian brunch complete with gondola. The panic set in after i got evertone else on board my imaginary gondola! You give me hope!
How wonderful. I totally get the panic!
Thank you. This is perfect for multi-cultural week. My class is presenting Italy.
I hope it is helpful!
Thank you so much for this! I was also desperately searching the internet for how to make a cardboard gondola with the same results you had! Then I found this post! I am so very grateful! 😀
I completely understand. It was quite the undertaking! Would love to see your finished work!
Thank you do much. My granddaughters are doing a Tangled themed quinceanera in November, now i can give them the gondola they want for pictures. Thank you so much.
I am so happy it helped. If it can help just one momma! Blessings, Christina
This is absolutely perfect!!! I’m going to go hunting for a large cardboard starting tomorrow! These pictures are SO helpful. Thank you so much!
I can’t tell you how this made my whole day!